Daily Archives: April 19, 2011
I almost got a sweet looking Mustang in exchange for this cake…
Seriously…I think there was a moment in time that she contemplated it for, like, a millisecond. I saw it in her eyes and the way she casually chuckled it off. Dang. It was sweet. Oh well, I tried.
Who is she? She is a very nice woman who works with my husband. Saturday was her birthday and she ordered a cake from me. A very special cake. I could rule the world with this cake. I am not kidding. It has special powers. I almost got a Mustang, right?
Now I have your attention. Ha-ha! This, is the most “awesomest” chocolate cake EVER! No joke. My husband and I created this monster. It is not our own creation, but we decided to put three elements together to create a dark chocolate masterpiece.
As I have mentioned more than once, I am a HUGE fan of dark chocolate. So is my husband. I keep in the house, Hershey’s Special Dark cocoa for baking. On the back of the container are a few lovely recipes that Hershey’s shares as suggestions for using the cocoa. The recipes are for a cake, frosting, naturally, and for a dark chocolate mousse. That is where I got my “a-ha!” moment. I can make the cake, make the mousse, layer it, and cover it in ganache. (yes, it is dark chocolate too).
I barely got the idea out of my mouth when my husband’s eyes got big (I think he was even drooling) and he asks if we are making it now. I took it as he thought this was a good idea too. He is so subtle sometimes. The next day I shopped for any missing ingredients so we could start the cake that night after dinner.
I made this cake over three nights. The first night, while Brad made the cake batter, I made the mousse. It was the first time I had ever made mousse from scratch. It was a lot easier than I thought. I slid the mousse into the fridge to set-up and let the cakes bake. Two 9-inch round cakes, by the way. Once the cakes cooled, I wrapped them individually in saran wrap and put them into the freezer.
The next night I removed and unwrapped the cakes. Using my serrated bread knife, I cut each cake in half, horizontally, creating 4 small cake layers. I placed the bottom layer on my cake plate, topped it with mousse, and spread it to the edge. I repeated this with the remaining layers. I then wrapped the cake, tightly, without squishing, with saran wrap and put it back into the freezer.
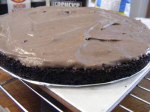
The last night I pulled the cake out of the freezer, unwrapped it, and proceeded to make my ganache. When the ganache was ready, I poured it over the cake. This was the only step I seemed to rush. The cake was not room temperature, so the ganache was not smooth. It didn’t look bad, but I knew the next time I would be mindful of that misstep.
While he was crying, we sliced up 3/4 of the cake to take to our respective places of employment to share with some co-workers. The birthday girl, mentioned above, was one of the lucky recipients. My husband had barely hit the door on his way out from delivering it to her when she exclaimed, “Oh my! I must have this for my birthday! Let your wife know I will be requesting one.” And, she did.
I did not make this over several nights this time. She was picking it up on Saturday evening so I had all day to make the cake. I also took the opportunity to research a little more about pouring ganache over a cake which helped tremendously. A baker suggested adding a tablespoon of butter to achieve a glossy look to the ganache. I did this for sure.
The only thing I did differently this time with the cake was not freezing the layers. I wish I had. It made it very easy to cut the cakes the first time, plus, I really needed to trim the sides more even so the ganache would be smooth all over. I attempted it, but the cake was so moist and it would have been a disaster for sure.
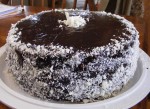
I did two pours of the ganache and used a flat spatula/spreader to smooth it over. The top came out great, the sides were choppy because I couldn’t trim them. I wasn’t happy with the sides and so I shaved some white chocolate to embellish the cake. I know, I used white chocolate, I was out of chocolate and I had to improvise. It turned out pretty I think. The birthday girl thought so too! That is really all that mattered at the end of the day. A happy customer.
I haven’t heard word yet of how she liked it. I only pray it was as good as she remembered.
Each recipe is below with assembly instructions below the recipes.
Have a wonderful week! Thanks for stopping by!
Dark Chocolate Mousse
Ingredients
- 1 envelope unflavored gelatin
- 1/4 cup cold water
- 1/3 cup boiling water
- 1 cup sugar
- 2/3 cup HERSHEY’S SPECIAL DARK Cocoa
- 2 cups (1 pt.)cold whipping cream
- 2 teaspoons vanilla extract
Directions
- 1 Sprinkle gelatin over cold water in small bowl; let stand 2 minutes to soften. Add boiling water; stir until gelatin is completely dissolved and mixture is clear. Cool slightly.
- 2 Combine sugar and cocoa in large bowl; add whipping cream and vanilla. Beat on medium speed of mixer, scraping bottom of bowl occasionally, until mixture is stiff. Pour in gelatin mixture; beat until well blended. Spoon into dessert dishes.
- 3 Refrigerate at least 30 minutes. Garnish as desired. Store covered in refrigerator. 8 servings.
HERSHEY’S “Especially Dark” Chocolate Cake
Ingredients
- 2 cups sugar
- 1-3/4 cups all-purpose flour
- 3/4 cup HERSHEY’S SPECIAL DARK Cocoa
- 1-1/2 teaspoons baking powder
- 1-1/2 teaspoons baking soda
- 1 teaspoon salt
- 2 eggs
- 1 cup milk
- 1/2 cup vegetable oil
- 2 teaspoons vanilla extract
- 1 cup boiling water
Directions
- 1 Heat oven to 350°F. Grease and flour two 9-inch round baking pans.
- 2 Stir together sugar, flour, cocoa, baking powder, baking soda and salt in large bowl. Add eggs, milk, oil and vanilla; beat on medium speed of mixer 2 minutes. Stir in boiling water (batter will be thin). Pour batter into prepared pans.
- 3 Bake 30 to 35 minutes or until wooden pick inserted in center comes out clean. Cool 10 minutes; remove from pans to wire racks. Cool completely.
Ganache
Ingredients
- 1 Half Pint Heavy Cream
- 1 10oz Pkg Nestle Toll House Dark Chocolate Morsels
- 1 Tbs Unsalted Butter
Directions
In a double boiler over simmering water, heat cream, be careful not to boil. Add morsels and butter; stir (DO NOT USE WOODEN SPOON) until warm and smooth. The key is to allow it to warm and not to get too hot.
Assembling Cake:
- Prepare each recipe as instructed.
- Allow mousse to firm in fridge at least 30 minutes.
- Allow cakes to cool in pans 10 minutes, then turn out on to wire racks and allow to cool completely.
- When mousse and cake is ready, carefully, split cakes horizontally. You should have 4 halves total.
- Place bottom layer on a 9-inch cake board.
- Spoon out mousse on to cake and spread evenly to the edge.
- Place next cake layer and repeat steps until you have 4 layers of cake and 3 layers of mousse.
- Set a cookie sheet with edges(jelly roll pan) on a flat surface and line with parchment paper.
- Put a wire rack on top of parchment paper on cookie sheet.
- Place a salad plate, or something similarly stable, turned upside down on wire rack. ( Something smaller than the 9-inch cake board. It will keep the cake raised above the wire rack to allow ganache, when poured, to run off the cake and not pool.)
- Prepare ganache
- Remove cake from freezer and place on top of plate on top of wire rack.
- Transfer ganache into a container that is easy to pour with, ie: measuring cup with a lip.
- Allow ganache to sit for about 15 minutes. Remember, warm, but not hot.
- Starting with the center of the cake, begin pouring in a circular motion, ever increasingly widening the circle until reaching the edge of the cake.
- With a large, flat edge spatula or spreader, smooth ganache from center to edge of cake and allow excess to run down sides of cake.
- Smooth side of cake.
- Wait 5 minutes and repeat the pouring and smoothing process.
**If the side of the cake is clean, the result will be a smooth finish. If you are not happy with the side of the cake, you can always embellish with nuts, coconut, shaved or curled chocolate, crushed cookies, or whatever sounds good to you.


